Table of Content
Hardware Related
No blue LED blinking
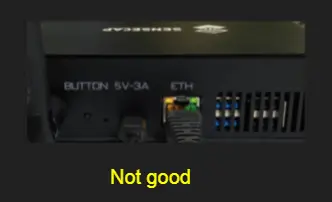

Troubleshooting Steps
- Check if the ETH LED is blinking. If ETH green and yellow lights are on and the blue LED is off, please flash a new SD card first. If the blue light is still off, that would be a hardware defect issue.
- If the green and yellow LED are off, try to make sure the power adapter is good. You may check by replacing it with a 5V-3A phone charger with a type-C cable and a new network cable to see if the problem is solved.
- If the hotspot connects internet via Wi-Fi, please check if the red light is on through the front panel, if not, that would be a hardware defect issue.
Network Related
Unable to connect to the Internet?
Having your network configuration setup correctly plays a major role. Please ensure you read all the details below to ensure proper configuration.
Helium Hotspots may not work if the Hotspot is behind a firewall or uses an incompatible NAT type as described below. In other cases, it may be because of a router configuration/network configuration or your connection is simply offline (no Internet).
Note: If you are not able to properly set up network configuration or the steps below do not work for you, please visit our >> Official Discord Channel for further guidance.
Troubleshooting Steps – Ethernet Connection
Please check your Ethernet cables if not using Wi-Fi: Make sure your Ethernet cable is securely plugged into the Hotspot from your router/modem.
- Blinking amber lights next to the Ethernet port on the Hotspot: Solid connection established.
- If you do not see blinking amber lights in the Ethernet port, please try a different cable as cables over time tend to fail.
Check your Internet connection: Please ensure that you are able to connect to the Internet from your location using your home computer/laptop/phone, on the same network. If you are unable to connect to the Internet, you will need to contact your Internet Service Provider (ISP) for additional assistance regarding your connection.
Troubleshooting Steps – Wi-Fi Connection
- If you are using Wi-Fi: Please confirm that you are able to connect to your wireless network with your WEP or WPA security password (aka, Wi-Fi password). If you do not know how to connect or access your wireless modem, you will need to contact the manufacturer of the equipment directly.
- If you’re unable to connect to the internet, power cycle your router. Unplug your Hotspot and router from your wall or power strip for 2 minutes. Then, plug them back in to see if you are able to connect to the Internet.
How to connect the Hotspot to my Phone’s WiFi?
This example is shown for Apple iOS devices below.
- Find “Settings” on your phone.
- Click “Personal Hotspot“.
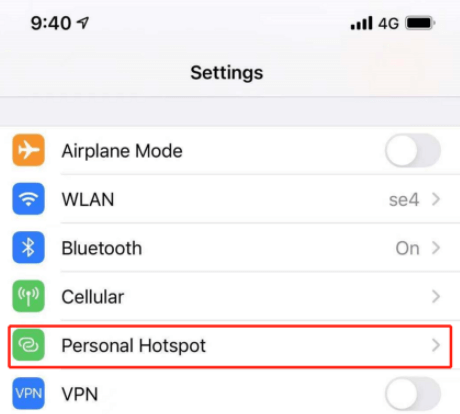
- Enable to allow others to join.
- Pair your Hotspot.
- Connect your Hotspot to your Apple iOS phone’s Personal Hotspot name.
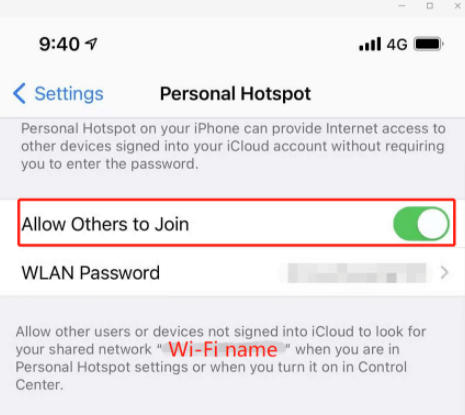
Now you can pair your SenseCAP Gateway to your phone’s personal hotspot via Wi-Fi to troubleshoot firmware updates and network connectivity.
SD Card Related
How To Replace The ‘config.json’ File
PROCEED WITH CAUTION: The following steps should be used ONLY if you’ve been advised by our Technical Support Team. You do not need to replicate these steps if you have NOT been advised.
NOTE: Do NOT use the same ‘config.json‘ files for other Hotspots. Each Hotspot has a unique ‘config.json‘ file attached to it’s serial number.
Instructions
The instructions below will help you replace the ‘config.json’ file in the Micro SD card. If you find the device is stuck on firmware/old version and deem it may be a potential error causing the failure, please follow the instructions to resolve the issue.
NOTE: Please check your Internet connection first to make sure the problem is not related to the Internet before you follow the steps below to replace the micro SD card.
Requirements
- Micro SD card in your SenseCAP M1 Hotspot
- Micro SD Card reader
- Screwdriver
- The ‘config.json‘ file copied from the original card
Note: Please ask our Tech Support Agents to provide one for you if you are unable to retrieve the original one.

Steps
- Step 1: Power off your Hotspot
- Step 2: Remove the antenna
- Step 3: turn to the front side of the panel

- Step 4: Use the screwdriver to loosen the two screws in the front of the panel

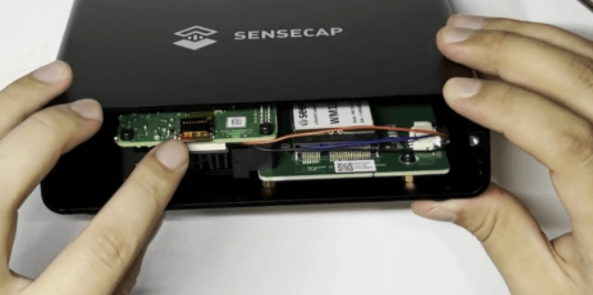
- Step 5: Move the front panel and put it aside

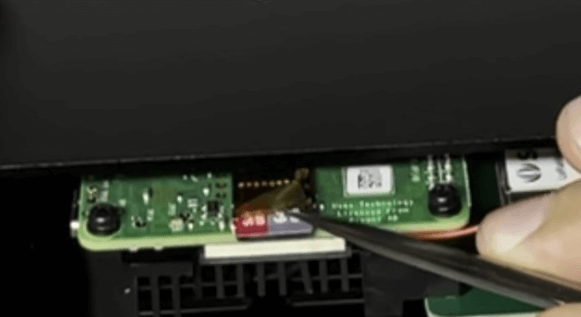
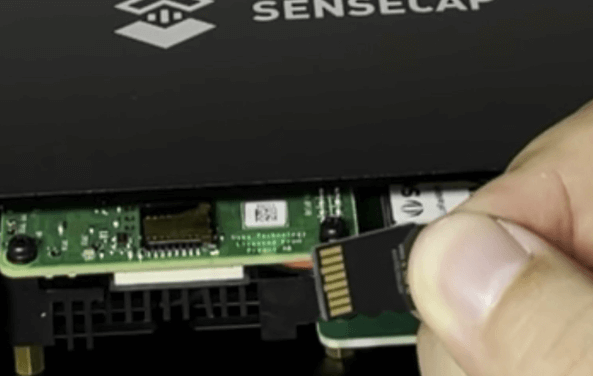
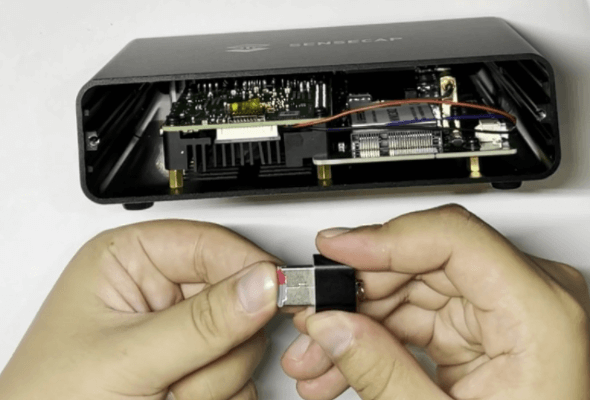
- Step 6: Remove the yellow stock on-top of the Micro SD card using tweezers and pull out the Micro SD card
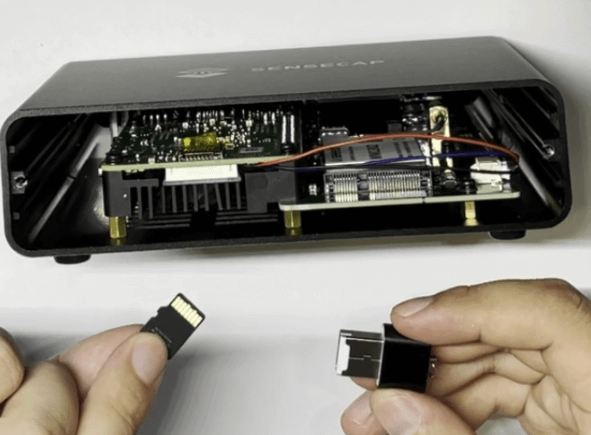
- Step 7: Plug the Micro SD card into a card reader and connect to your computer
NOTE: If you are using a Windows OS and asked “You need to format the disk in drive “X” before you can use it”, click “Cancel” otherwise your Micro SD card data will be erased.
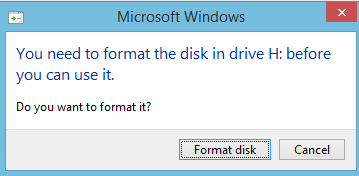
Windows Prompt on Micro SD Card Insertion
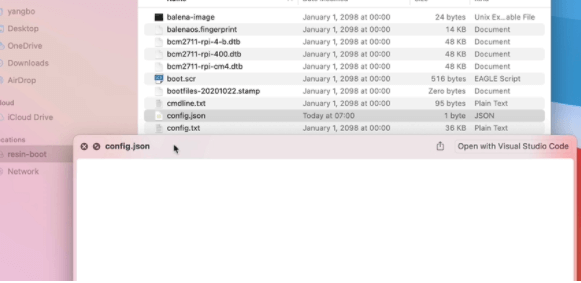
- Step 8: You will now find there is a ‘config.json’ file in the ‘resin-boot‘ folder, please open it using notepad to confirm it is empty.
If it is NOT empty, there is an OTA (over the air update) problem caused by the config file, it is a network connection issue. Please check your network and security/firewall settings.
If it IS empty, please replace it using the new ‘config.json’ file we give you to replace it.
- Step 9: If the ‘config.json‘ file is empty, you will need to replace it with the one we provide. Drag the new file into the disk and click ‘Replace’.
NOTE: Please do NOT delete any other files, otherwise, it will cause unexpected issues with your SenseCAP M1.
NOTE: Every device has a different ‘config.json’ file registered to it, please do not share your ‘config.json’ file with others or use files from others.
For MacOS
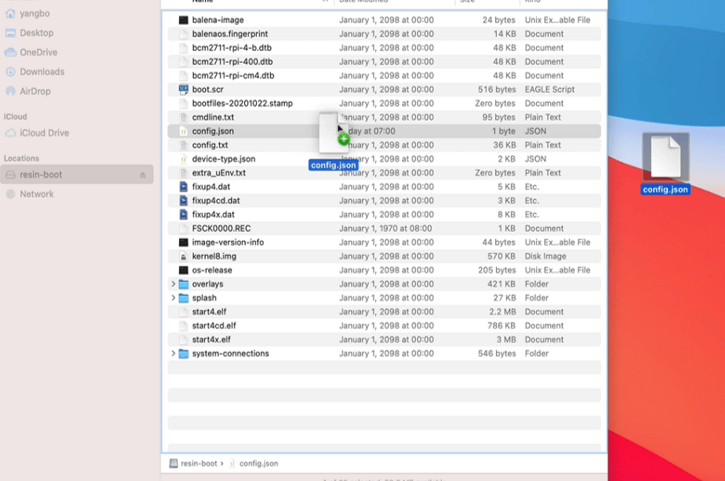
MacOS – Copy ‘config.json’ File
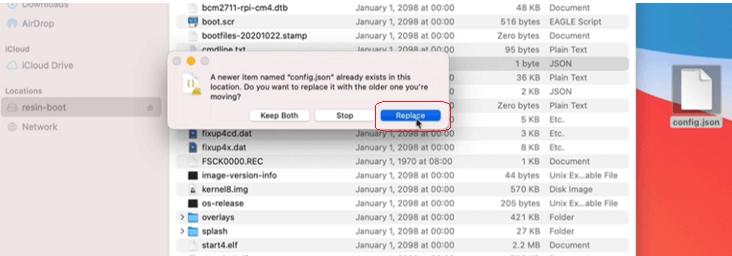
For Windows
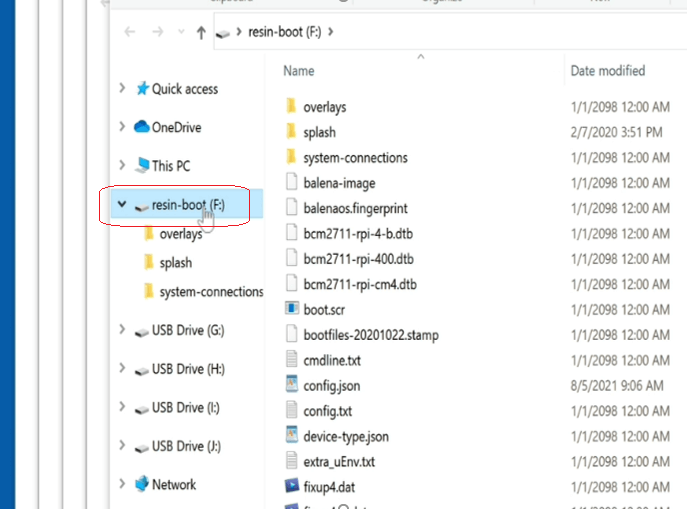
Windows – Copy “config.json” File
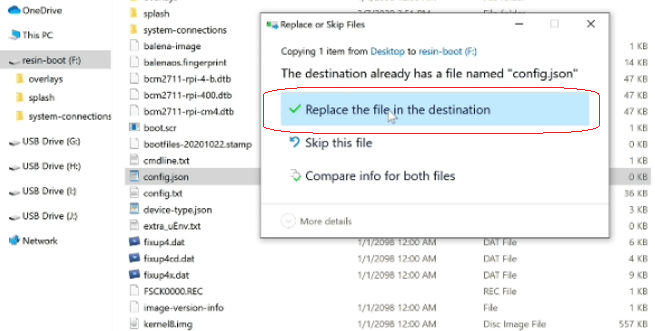
Note: It is recommended double check there is contents inside the ‘config.json‘ file after copying it over simply by opening it in Notepad.
- Step 10: Put the Micro SD card back inside the Hotspot
TIP: Assemble the front panel after you confirm that your Hotspot is up and running.
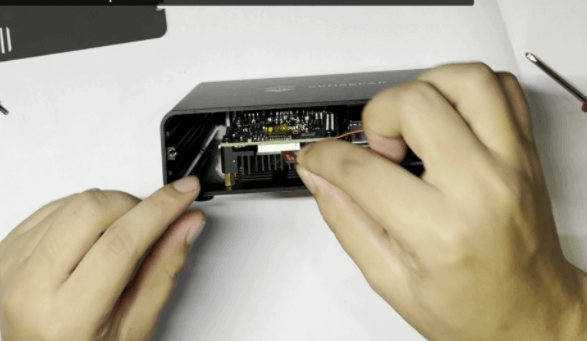
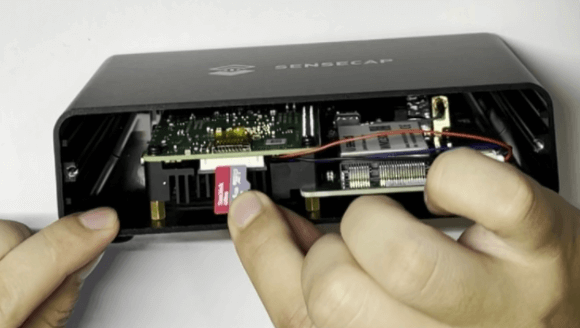
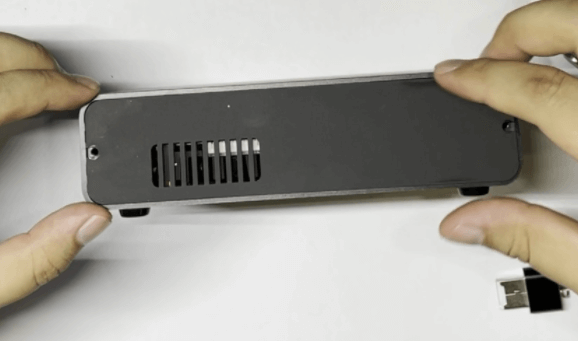
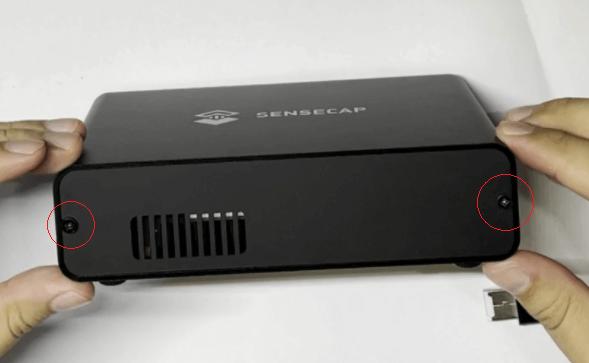
- Step 11: Assemble the antenna and power-up your Hotspot
Power on the SenseCAP M1, connect to the internet (better with ethernet cable), wait ~20mins for OTA updates, and check the status on Dashboard (https://status.sensecapmx.cloud/) or run diagnostics within the Helium APP.
Should you have any further issues or questions, please open a ticket here: https://support.sensecapmx.com
How To Flash A New Image To A New Micro SD Card
PROCEED WITH CAUTION: The following steps should be used ONLY if you’ve been advised by our Technical Support Team. You do not need to replicate these steps if you have NOT been advised.
Due to the misuse of Hotspots by users, we’ve found that frequent power cycling, plugging, and unplugging the micro SD card, may result in unknown micro SD card errors, such as file system alignment.
If you have been advised to replace the micro SD card to debug the issue, please follow the instructions below carefully.
Instructions
The instructions provided below will help you flash images to a new micro SD card and to replace the original one in SenseCAP M1 in order to fix the problem caused by potential micro SD card errors.
NOTE: Please check your Internet connection first to make sure the problem is not related to the Internet before you follow the steps below to replace the micro SD card.
Requirements
Note: We now have the SD card replacement kit available, which you can purchase by clicking here .

The kit comes with a screwdriver, a MicroSD card reader, a 64GB MicroSD card, and an instruction about how to replace the MicroSD.
- New Micro SD Card (SanDisk High Endurance 64GB)
- Micro SD Card reader
- Screwdriver
- The ‘config.json‘ file copied from the original card
- Note: Please ask our Tech Support Agents to provide one for you if you are unable to retrieve the original one.
Steps
- Power off the device, open the front panel, remove the yellow sticker on the top of the micro SD card (you may use tweezers), and unplug and take out the original micro SD card.
- Connect the original micro SD card to your computer with a micro SD card reader and copy the ‘config.json’ file from partition “resin-boot” of the origin SD card, save it to your computer
- Note: Please ask our Tech Support Agents to provide one for you if you are unable to retrieve the original one.
- Download the SenseCap M1 Image from here: sensecap-m1-sd-version-20220213.img.zip
- Download the Balena Etcher tool from here: balenaEtcher – Flash OS images to SD cards & USB drives
- Flash the SenseCap M1 Image to the new micro SD card with Balena Etcher.
- Copy the “config.json” file that we provided from your computer to partition “resin-boot” of the new micro SD card after flashed.
- Unplug the new micro SD card from your computer, and plug it into SenseCap M1.
- Power on the SenseCap M1, connect to the internet (better with ethernet cable), wait for 20mins updates, and check the status on Dashboard (https://status.sensecapmx.cloud/) or run diagnostics in Helium App.
Note: You should assemble the front panel of the Hotspot only after you confirm that your Hotspot is OK.
How To Open SenseCAP M1 and Replace The Micro SD Card
- Step 1: Power off your Hotspot, then remove the antenna.

- Step 2: Use the screwdriver to loosen the two screws in the front panel.

- Step 3: Move the front panel and put it aside.

- Step 4: Remove the yellow sticker on top of the Micro SD Card (you may use tweezers).

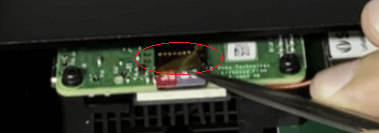
How To Read The Micro SD and Flash The Image
- Step 1: Plug a new Micro SD Card into the Micro SD Card reader.

New Micro SD Card Into Micro SD Card Reader

- Step 2: Flash the SenseCAP M1 Image to the new Micro SD Card with Balena Etcher.
- Download the SenseCap M1 Image from here: sensecap-m1.img.zip
- Download the Balena Etcher tool from here: balenaEtcher – Flash OS images to SD cards & USB drives
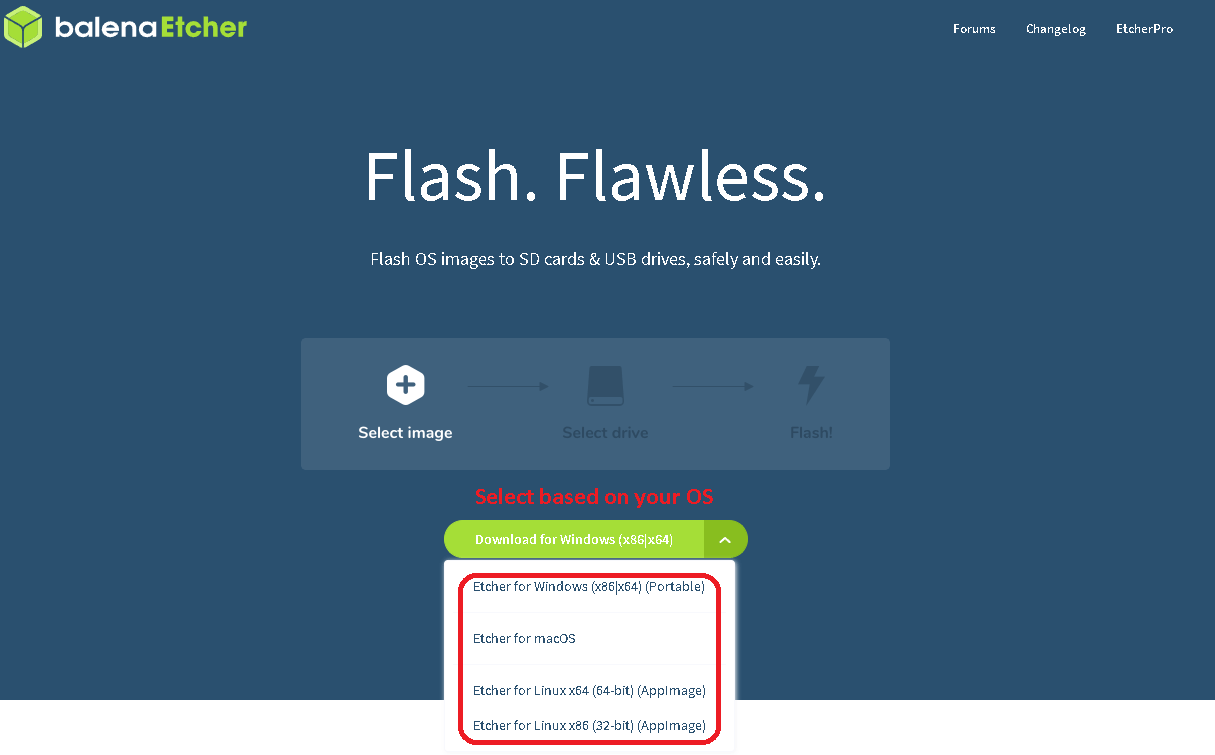
Select Based On Your Operating System
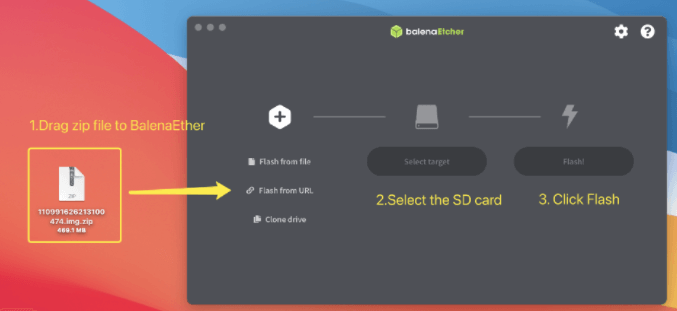
Drag Image.ZIP File To Balena Etcher
- Step 3: After you’ve successfully flashed the image to the MicroSD Card, copy the “config.json” file that we provided/or you copied originally, from your computer to a partition called “resin-boot”.
For MacOS

MacOS – Copy ‘config.json’ File
For Windows

- Step 4: Unplug the new Micro SD Card from your computer.
- Step 5: Plug the new Micro SD Card into your SenseCAP M1.
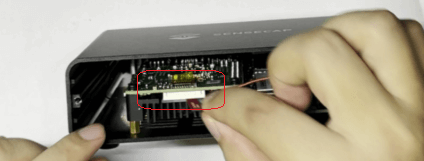
- Step 6: Power on the SenseCAP M1, and connect back to the Internet (best with Ethernet cable).
- Step 7: Wait approximately ~20 minutes to apply updates and check the Dashboard (https://status.sensecapmx.cloud/) or run diagnostics in Helium App after this is complete.
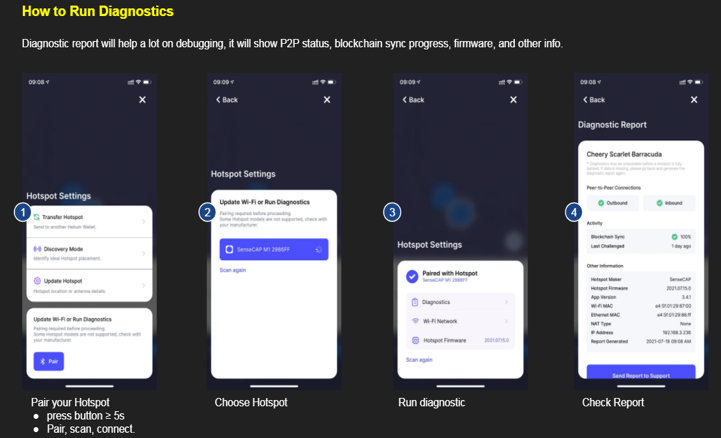
Note: You should assemble the front panel of the Hotspot only after you confirm that your Hotspot is OK.
Should you have any further issues or questions, please open a ticket here: https://support.sensecapmx.com/
How To Format the Micro SD Card and Flash the Image
PROCEED WITH CAUTION: The following steps should be used ONLY if you’ve been advised by our Technical Support Team. You do not need to replicate these steps if you have NOT been advised.
Due to the misuse of Hotspots by users, we’ve found that frequent power cycling, plugging, and unplugging the micro SD card, may result in unknown micro SD card errors, such as file system alignment.
If you have been advised to replace the micro SD card to debug the issue, please follow the instructions below carefully.
Instructions
The instructions provided below will help you flash images to a new micro SD card and to replace the original one in SenseCAP M1 in order to fix the problem caused by potential micro SD card errors.
NOTE: Please check your Internet connection first to make sure the problem is not related to the Internet before you follow the steps below to replace the micro SD card.
Requirements
- Micro SD card in your SenseCAP M1 Hotspot
- Micro SD Card reader
- Screwdriver
- The ‘config.json‘ file copied from the original card
- Note: Please ask our Tech Support Agents to provide one for you if you are unable to retrieve the original one.
- SD Card Formatter 5.0.1
- For Windows => Click here to download and install
- For Mac OS => Click here to download and install
- SenseCAP M1 Image => Click here to download
- Balena Etcher => Click here to download

The kit comes with a screwdriver, a MicroSD card reader, a 64GB MicroSD card, and an instruction about how to replace the MicroSD.
Steps
- Power off the device, open the front panel, remove the yellow sticker on the top of the Micro SD card, unplug the Micro SD card.
- Connect the Micro SD card to your computer with a Micro SD card reader and copy the ‘config.json’ file from partition “resin-boot”, save it to your computer.
- Note: Please ask our Tech Support Agents to provide one for your if you are unable to retrieve the original one.
- Format the MicroSD card using “SD Card Formatter 5.0.1”
- Flash the SenseCap M1 Image to the MicroSD card with Balena Etcher.
- Copy the ‘config.json‘ file from your computer to partition “resin-boot” of the Micro SD card.
- Plug back the Micro SD card from your computer into SenseCap M1 Hotspot.
- Power on the SenseCap M1, connect to the internet (better with ethernet cable), wait ~20mins for OTA updates, and check the status on Dashboard or run diagnostics within the Helium APP.
Note: You should assemble the front panel of the Hotspot only after you confirm that your Hotspot is OK.
How To Open SenseCAP M1 and Replace The Micro SD Card
- Step 1: Power off your Hotspot, then remove the antenna.

- Step 2: Use the screwdriver to loosen the two screws in the front panel.

- Step 3: Move the front panel and put it aside.

- Step 4: Remove the yellow sticker on top of the Micro SD Card (you may use tweezers).


How To Format The Micro SD Card (Windows)
- Step 1: Plug a new Micro SD Card into the Micro SD Card reader.

New Micro SD Card Into Micro SD Card Reader

- Step 2: Install and run SD Card Formatter
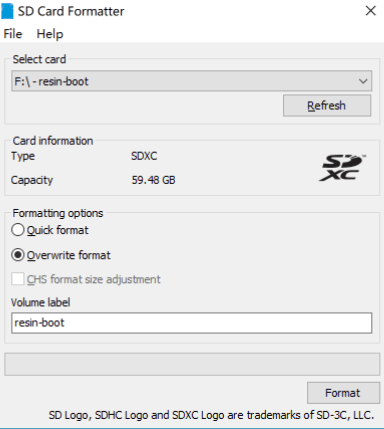
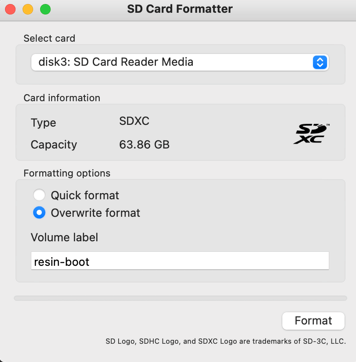
- Step 3: Select the Micro SD card you connect to the computer, choose “Overwrite format”, type “resin-boot” in the Volume label, and click the “Format” button
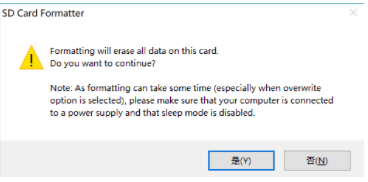
- Step 4: Select “Yes” on the dialogue window
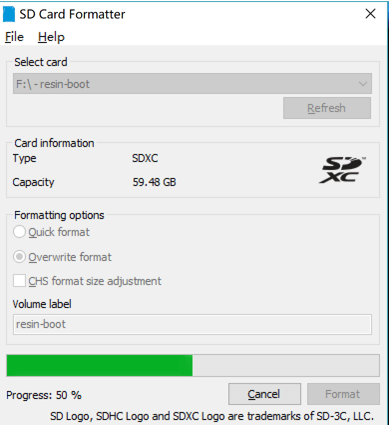
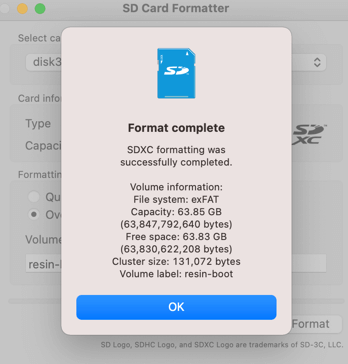
- Step 5: Wait for ~30-45 minutes and the formatting process will be completed
How To Format The Micro SD Card (MacOS)
The steps are similar, please see the images below:
How To Flash The Image to the Micro SD Card
- Download the SenseCap M1 Image from here: sensecap-m1-sd-version-20220213.img.zip
- Download the Balena Etcher tool from here: balenaEtcher – Flash OS images to SD cards & USB drives

Select Based On Your Operating System

Drag Image.ZIP File To Balena Etcher
How To Add ‘config.json’ File To the Micro SD Card
After you’ve successfully flashed the image to the MicroSD Card, copy the “config.json” file that we provided/or you copied originally, from your computer to a partition called “resin-boot”.
NOTE: Please do NOT delete any other files, otherwise, it will cause unexpected issues with your SenseCAP M1.
NOTE: Every device has a different ‘config.json‘ file registered to it, please do not share your ‘config.json‘ file with others or use files from others.
For macOS

MacOS – Copy ‘config.json’ File

For Windows

Windows – Copy ‘config.json’ File

After Formatting The Micro SD Card and Flashing The Image
- Step 1: Unplug the new Micro SD Card from your computer.
- Step 2: Plug the new Micro SD Card into your SenseCAP M1.

- Step 6: Power on the SenseCAP M1, and connect back to the Internet (best with Ethernet cable).
- Step 7: Wait approximately ~20 minutes to apply updates and check the Dashboard (https://status.sensecapmx.cloud/) or run diagnostics in Helium App after this is complete.

Note: You should assemble the front panel of the Hotspot only after you confirm that your Hotspot is OK.
Should you have any further issues or questions, please open a ticket here: https://support.sensecapmx.com/
Helium App Error
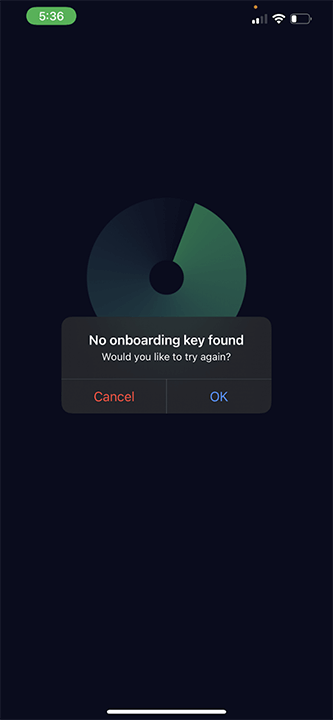
No Onboarding Key Found
Please open a support ticket here: https://support.sensecapmx.com and send your hotspot SN (serial number) so we may resolve your issue.
No Hotspot Found
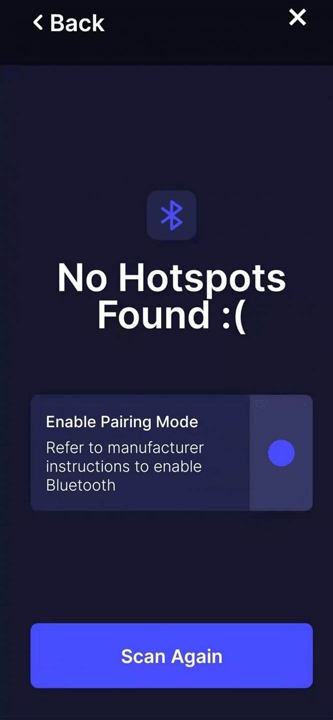
“No Hotspots Found” shown in Helium App
Troubleshooting Steps
- Check the blue LED first, it should be in slow flashing mode.
- If not, that indicates your SenseCAP M1 hasn’t enabled Bluetooth configuration mode. Check with your hotspot and mobile phone to make sure Bluetooth has been turned on.
- Press the button on the back of SenseCAP M1 for 6-10 seconds to enable SenseCAP M1’s configuration mode, you will find the blue LED turns to slow flash mode (flashing 1 time every 2 seconds), then scan the hotspot again.
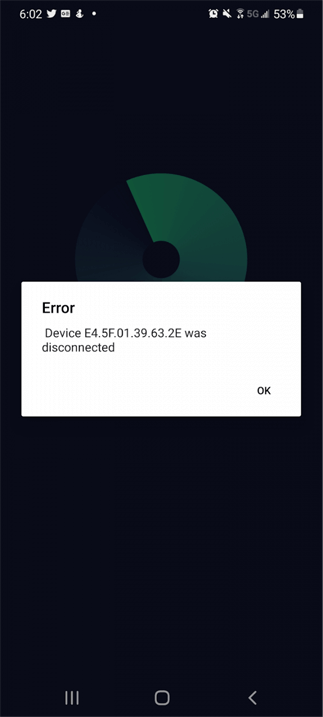
Device Disconnected
The device was disconnected when pairing via Bluetooth
Troubleshooting Steps
A compatibility issue occurs when you are using a Samsung phone newer than the S9.
Please Flash the SD card with the new image.
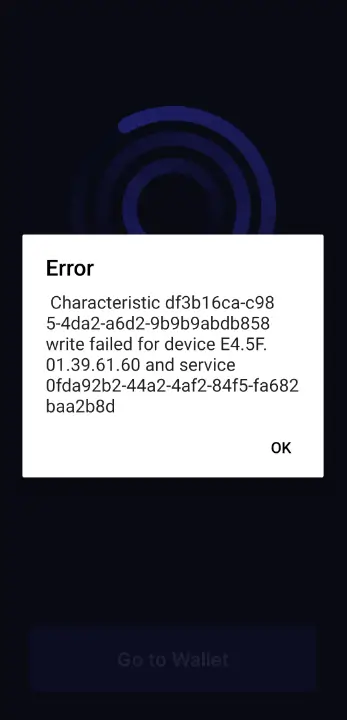
Characteristic Write Failed
Unable to register the Hotspot within the Helium App
Troubleshooting Steps
- If you register your hotspot right after you connect via Ethernet or Wi-Fi, you will see this error since the OTA (over-the-air updates) are running.
- Please leave your Hotspot connected via Ethernet or Wi-Fi for another 10+ mins. This will allow OTA updates to finish.
- Long press the button for 6-10s to enter configuration mode and then try to register again.
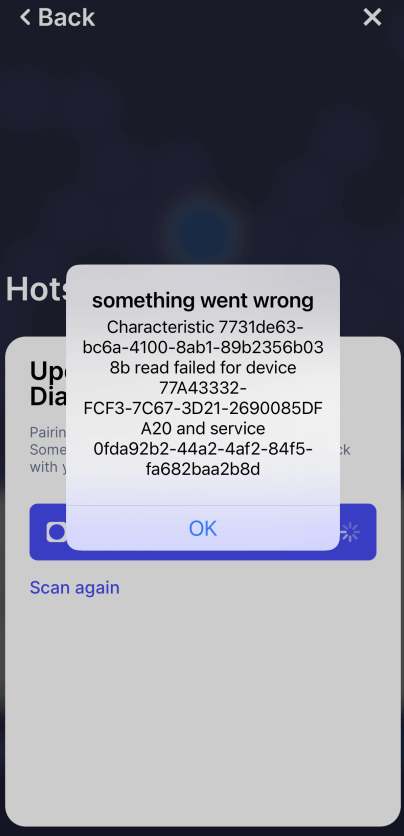
Characteristic Read Failed
Error when pairing with Bluetooth or connecting to Wi-Fi
If you receive the following error message when trying to pair your Hotspot to connect via Bluetooth or connect to Wi-Fi, this means the SSID of your Wi-Fi network contains invalid characters that are not recognized.
Please avoid using non-alphanumeric characters (e.g. characters other than a – z, 0 – 9) and symbols.
Solution: Rename your Wi-Fi network without symbols and non-alphanumeric characters.
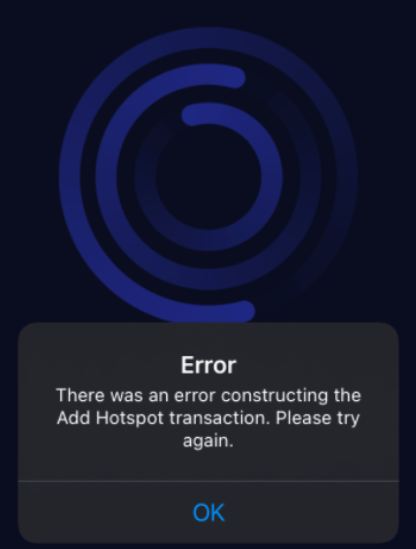
Constructing Add Hotspot Transaction
Helium App shows an error constructing the add hotspot transaction when registering the Hotspot
Troubleshooting Steps
- If you register your hotspot right after you connect Ethernet or Wi-Fi, you will see this error since the OTA (over-the-air updates) is running or the blocks have not been fully synced yet.
- Please leave your hotspot connected to Ethernet or Wifi for at least 30 mins to wait for it to finish the firmware OTA and the syncing process of blocks. After that, please long press the button for 6-10s to enter configuration mode and then try to register again.
- Check the firmware version after completed using diagnostics or the SenseCAP Dashboard to make sure it is up to date.
- Note: If the firmware of your hotspot cannot update to the newest version, then it is suggested to change the network your device using to another network, such as your mobile phone hotspot, and then follow the second step mentioned above.
- Note: If the blocks cannot be fully synced by the device itself after the firmware OTA is finished, then it is suggested to reset blocks in the local console.
Asserting Location/Antenna
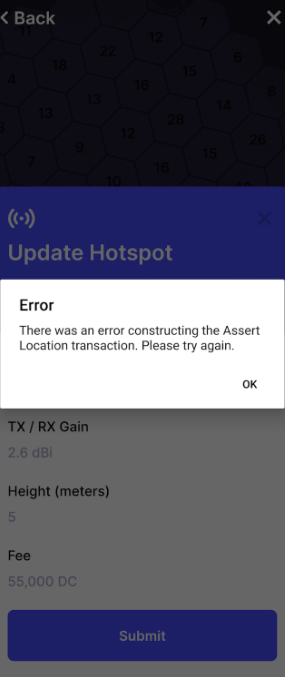
When trying to update the Antenna Details or Asserting Location, you see the following error
Troubleshooting Steps
The problem is related to the network connection or App. Try to restart your APP or try it again at a later time.
